Tutorials
Study these tutorials to learn StarFisher basics in a short time. Please read the main concepts first.
- First Steps
- Comparison Horoscope
- Searching for transits
- Searching for directions
- Working with multiple horoscopes and views
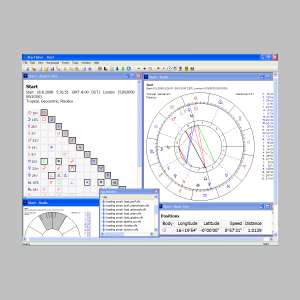
First Steps
After the installation is complete, launch StarFisher, and a new horoscope dialog will appear. This default window, if accepted, will create a "Chart for Now" using the current time and default location. (Note: The default location depends on the installation language but can be changed).
To create a horoscope of your choice, click the "New" button. If you have already clicked OK and created a "Chart for Now", simply select the menu item Horoscope | New Horoscope and the same initial new horoscope dialog will appear. To create a natal horoscope, select the following items from the new horoscope dialog.
Standard (default), for single event charts. Click the New button in the Primary event data box, and a new window for the event will open. Enter the name of the event, e.g. your name, date and time of your birth and click the Atlas button to select the place of event (e.g. the town where you were born). Just type the name of the place, if more places are available, select the right one from the list and click OK. You are now back in the event dialog window and should now be fully described, so click OK again. Now, you can change the horoscope description or leave it as it is and click OK again.
A radix (chartwheel) should now appear. This is the common way to display the horoscope. However there are many more ways, For instance, to see the aspects, select menu View | Aspectarium. To get back, select menu View | Radix. This can be done via the toolbar as well. Further details of each view is described in the Views page.
StarFisher is highly customizable and one of the first things you may wish to do is to set a particular city as the default location. First, simply create a horoscope for the city in question, if you have not already done so. With this horoscope open as the current event, select Tools | Set event place as default. You must also save the settings from the File menu (otherwise the change would only be kept for the current session).
Most customizations such as the house system used, orbs, bodies and aspects are contained within the menu item Tools | Settings. Note that context help is available, so whenever you need help, just press F1 or click the Help button.
After performing any customization, don't forget to save the settings from menu item File | Save Settings as Default.
Comparison Horoscope
A comparison horoscope is used to compare two charts. Such charts may include an event, such as a nativity (Birth; date, time and place of birth), transit, or direction (the theoretical advance of a body or point in a chart).
To generate a comparison horoscope select the menu item Horoscope | New Horoscope to invoke the new horoscope dialog (if not already open when StarFisher is initially launched). Make sure you have created an event as described in the First Steps. First, change the Horoscope Type by selecting Comparison (Standard/Standard). If a chart is open and active, this will be the Primary Event. If no chart is open press the Load... button from the Primary Event Data area and choose a pre-saved event. As the Secondary Source area is no longer grayed out, you can decide whether to compare two distinct nativity's or a natal horoscope and a specific date. To compare two nativity's, select Event as the Secondary Source. Press the New... button to create a secondary event data which is similar to the way you created the primary data. With the Primary and Secondary data visible, you can optionally change the horoscope description.
Click OK and a comparison wheel should appear. You may swap the inner and outer wheel by pressing SPACE. To switch between displaying mutual aspects and aspects for the inner wheel only, press TAB.
Searching for Transits
Create a natal horoscope as described in the First Steps. Next, select the menu item View | Transits and Directions.... A Transits and Directions window will appear. As we wish to calculate basic Transits, leave the Type of Calculation field as Transits and Options check boxes unchecked. In the From and To fields, enter the dates for the time span you wish to use for the transiting period. Please note that the default is to calculate transits for one year, and may generate an extensive list unless you limit the number and type of planetary bodies. You may also enter a GMT value instead of the default Auto to use in the calculations as well as optionally checking DST (Note that GMT -08:00 is equivalent to PST).
If you wish to select the type of Transiting Bodies, move the cursor towards the top left of the Transits and Directions window and select Transiting Bodies. A new sub-window appears enabling the selection of bodies from Available items. Let's say we are interested in Saturn transits over Sun and Moon and we are interested in conjunctions and oppositions only. To do so, mark all bodies except for Saturn in the Selected items field and move them to the right pane using the Right arrow button. If Saturn were in the right pane (Available items field), select it and move it to the left pane using the Left arrow button.
Next select Transited Bodies from the top left list of this window and leave only the Sun and Moon in the left pane of Selected items. In the Used Aspects section, leave Conjunction and Opposition in the left pane of Selected items and press OK. After few seconds or minutes a list of transits will appear. Each row represents a transit, beginning with date and time and followed with the transit details.
In the Date column, note that each value is selectable and underlined. By selecting a date, you can create additional charts based on this specific transit. For example, select (click) on a date and choose Comparison H. (comparison horoscope) for the transit moment you are interested in. An Edit Horoscope window will appear, and for now just click OK. A comparison horoscope wheel for the primary event and the transit time will appear. When you become more familiar with StarFisher, explore the Advanced options (Advanced... button in the lower left corner) before clicking OK.
Note that if you select View | Radix from the menu list, or any other view, the Transit List will disappear and has to be recalculated to be redisplayed.
Searching for Directions
With a natal chart available and displayed, select the menu item View | Transits and Directions.... A Transits and Directions window will appear. In the Calculate field, change the Type to Secondary Direction (Progressed). Leave the Options check boxes unchecked. In the From and To fields, enter the dates for the time span you wish to use for the progressed period. A time span of a year would be a good start.
After few seconds or minutes a list of transits will appear. Each row represents a transit, beginning with date and time and followed with the transit details. As described in the tutorial Searching for transits, by selecting a date, you can create additional charts based on this specific progression.
As in the case of the Transit List if you select a different view from the View menu list, the transit list will disappear and has to be recalculated to be redisplayed.
Working with multiple horoscopes and views
StarFisher lets you work with more horoscopes and more views at once. A Horoscope can be displayed in many forms (as so-called views), e.g. as a radix, position listing, aspectarium etc. All these views are views of the same horoscope, only in various visual forms. Furthermore, you can work with multiple horoscopes at once. For instance you can have two views of the same horoscope of person A, Radix and Aspectarium in two windows and another aspectarium view of another horoscope of person B in a third window.
You actually worked with more horoscopes at once in the last tutorial. Just select the Window menu and there is a numbered list of views you can select. An easy way to switch among views is to press CTRL + TAB. The views now overlap so you can't see them all at once. To change it, select menu Window | Tile. Now each view is in a small window you can drag and resize.
To create a new view of an existing horoscope, select Window | New Window. If you close the last view of a horoscope, the horoscope would be closed as well. Remember to save new events by selecting the menu item Event | Save Event Data As... and any specific settings such as Transit Bodies by selecting the menu item File | Save Settings As Default.
 Home
Home Features
 Screenshots
 Downloads
 Documentation
 Known Bugs
 Forum
Forum Contact
 Cesky
Cesky English
 Francais
 Italiano
 Slovenski